Classify and Label short texts
Welcome to this new post about my Data Analytics journey.
One day I stumbled upon an Excel sheet with a few thousand rows and 1 column, all containing tips that had been sent out by a Dog Trainer to her clients. This list of tips was not classified in any way, it contained many similar cells, and had not been labeled. This caused the Dog Trainer to spend a lot of time connecting the right tip(s) to the right client, each day a new client came forward that needed support.
I took the challenge, improved the dataset and added a lot of value to it. Let’s see how this went.
The dataset
I had one Excel file that consisted of 8600 rows (tips) all in written text. The size of the dataset was relatively small, but needed some cleaning and preprocessing. The steps I took in this respect were:
– Load the Excel in VS Code (Python Editor) for further processing
– Cut the file into 3 columns (name of the dog, the tip, sequence number)
– I then removed special characters (comma’s, quotes, icons) from the Tip column to not upset the ML process.
– I removed leading spaces, whitespace and empty rows.
I saved the file as a parquet type. Parquet files are faster to read by ML models, and an easy way to retain the texts.
Let’s classify
The Classification Method
The first challenge for me was to cluster/ classify all of the tips into bins. There is no easy (automatic) way to do this, so as a data scientist I had to come up with a solution. I concluded that working with unsupervised (unstructured) data required a specific ML model to do the job. I choose KNN (K-Nearest Neighbour).
KNN sounds complex, but it is a relative simple way to group data points around a center (centroid). In the algorithm you can specify how many ‘K’s’ or bins you want to use. It is very important to make an estimated guess, because a small number of bins can mean that certain texts are grouped with texts that are not really similar. After some checking and tweaking I came up with a number of 50. So, the system will put each Tip into 1 of 50 clusters, depending on how similar the texts are.
The choosen software solution (Azure ML Designer by Microsoft)
I am a certified Azure ML scientist, and know how to use Azure Machine Learning by Microsoft. The system is a state of the art solution that can handle virtually any type of problem that requires Machine Learning Models to make predictions. So, for my case an excellent opportunity to use the system with a real live example.
Running a job on Azure ML requires some configuring (and hurdles to overcome). The system is huge and has endless possibilities. My choice was to go for the Designer flow, which is a drag and drop system with a canvas that can hold different modules that each need to be configured. The entire flow of modules is called a pipeline.
When the pipeline (steps) are ready, you have to select a Computer Instance to run this job on. This is the moment you start to pay for what you are doing. On Azure, it’s all about computer power and computer time.
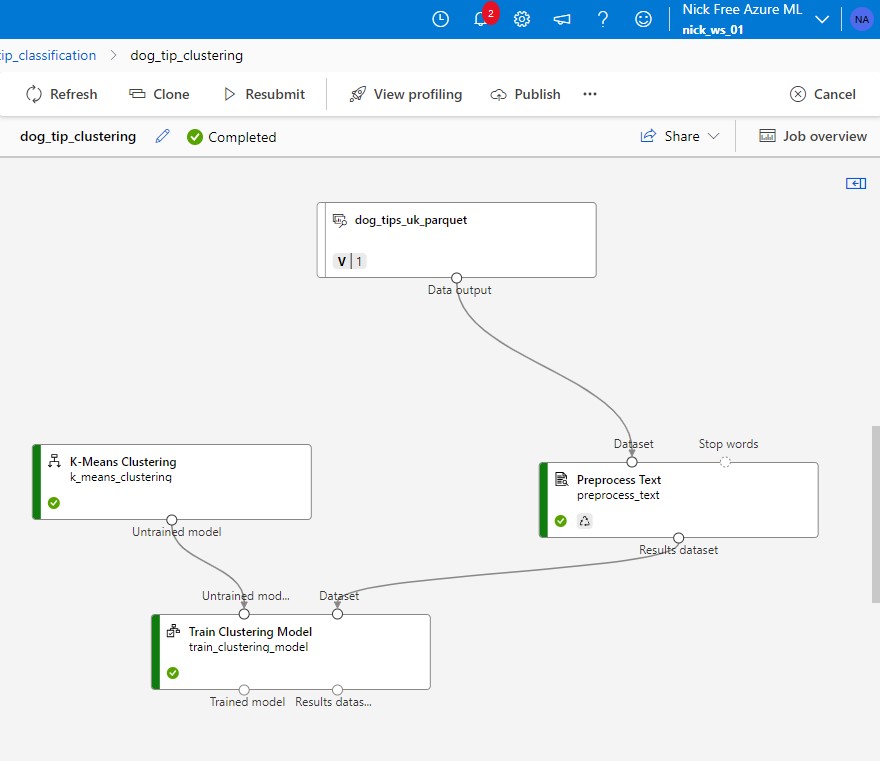
Overview of the Designer Pipeline with data input at the top, a module to preprocess texts and the K-Means model that will take care of the clustering. The Training takes places in the final module. Here a new parquet file is created with cluster data added to it.
Classification ready
In my case it took about 30 minutes for Azure ML to complete the job. The output is a parquet file with each Tip assigned a cluster number, and added information about its distance to the closest centroid. Having this information we can now filter out all duplicate or similar tips by picking each cluster number.
A closer look
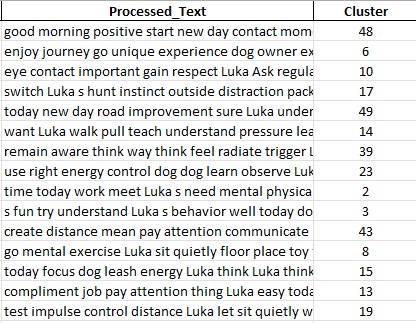
If we zoom in further on the cluster column and we find the following data:
This box shows us 15 of the 8500 rows that have been put into a cluster.
It is striking that the Preprocessing Module has cleaned almost all special characters, numbers and capital letters. Basically only words are left. These words can be compared and clustered, like the KNN model has done here. It has categorized the tips into 50 clusters or bins. When done in Azure ML Designer the system will not only add the cluster number but also a couple of other columns with the distances to the centers (centroids) of other bins. This can help to decide whether the number of clusters is correct or could be adjusted somewhat.
Two insightful plots
I have created to plots related to this new clustering:
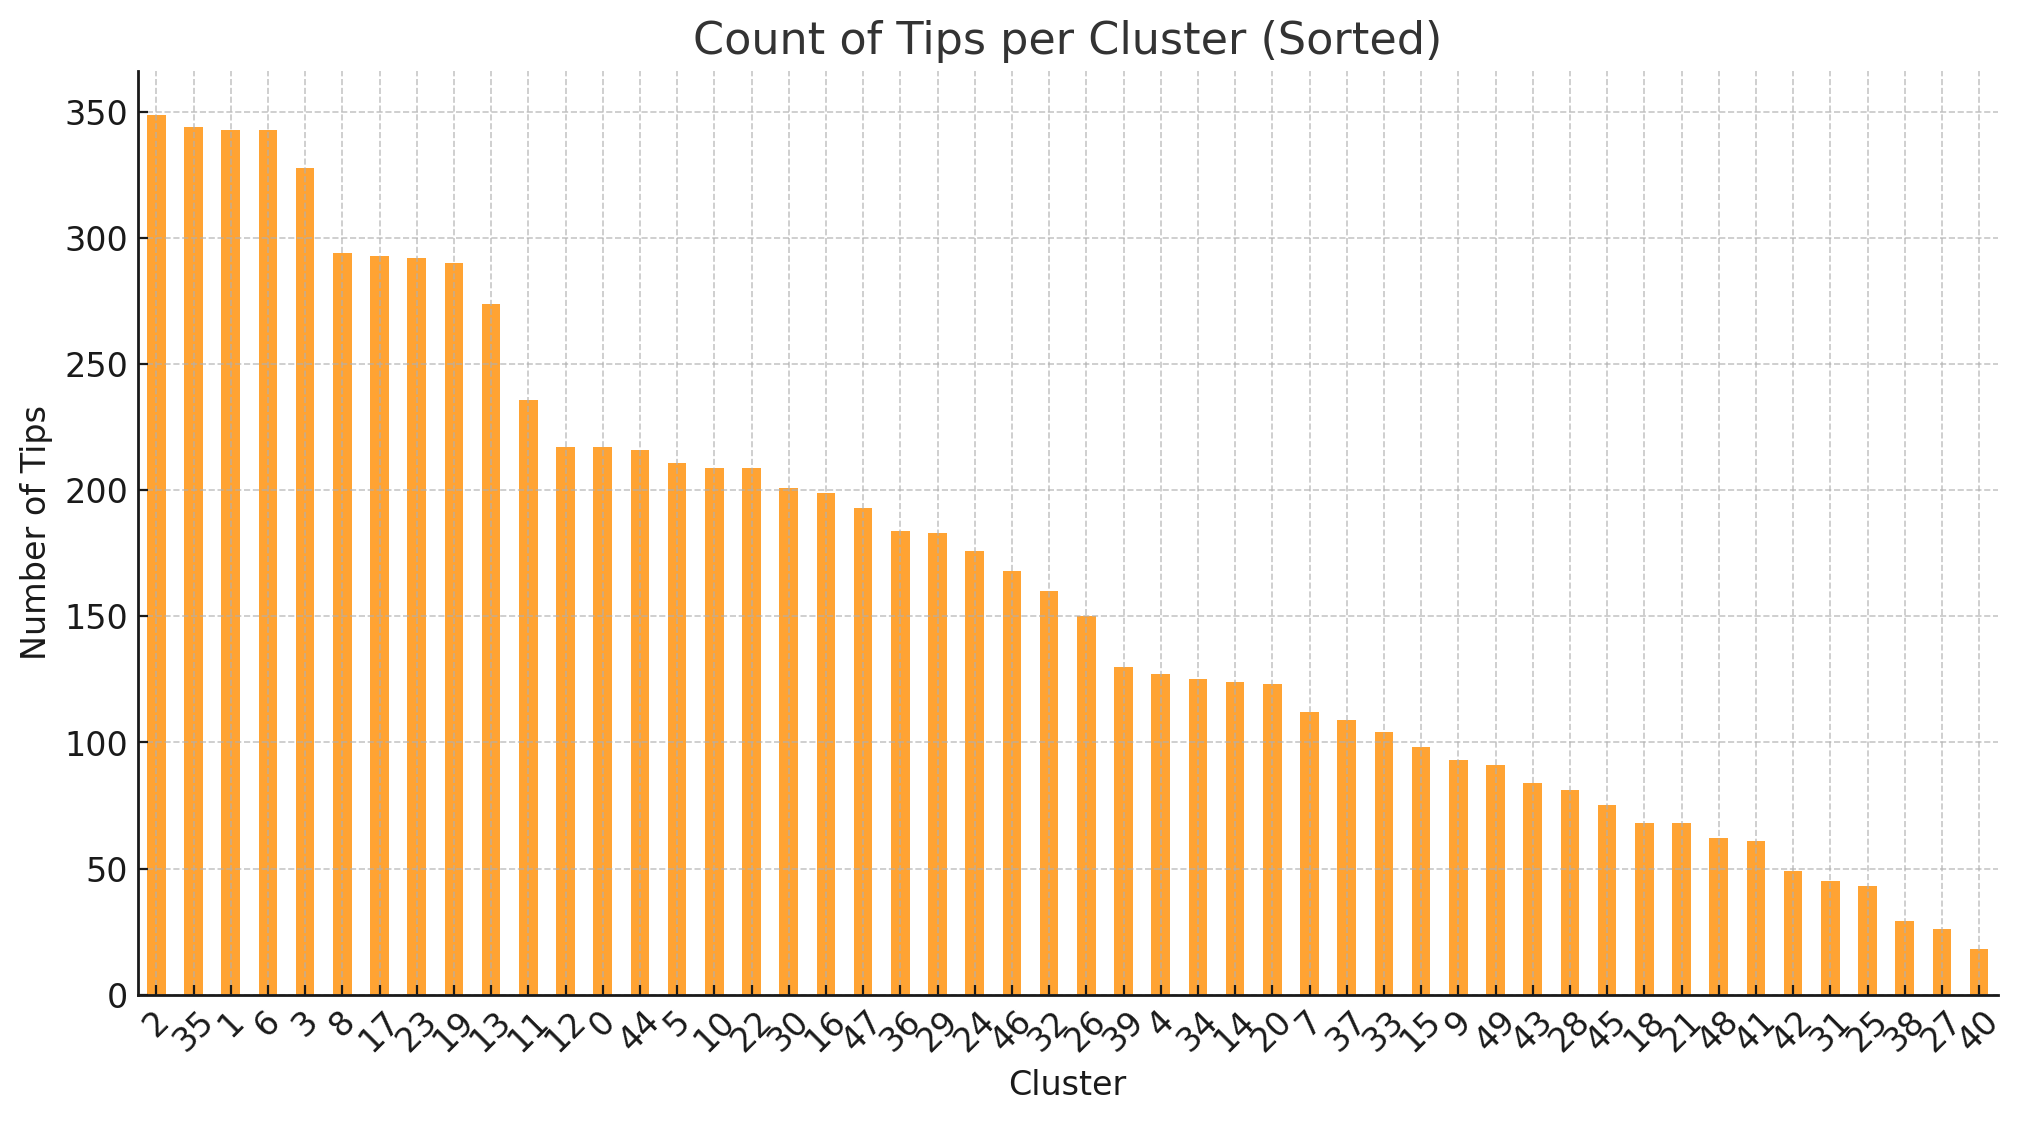
– first one is a histogram with an overview of how many tips are categorized per cluster
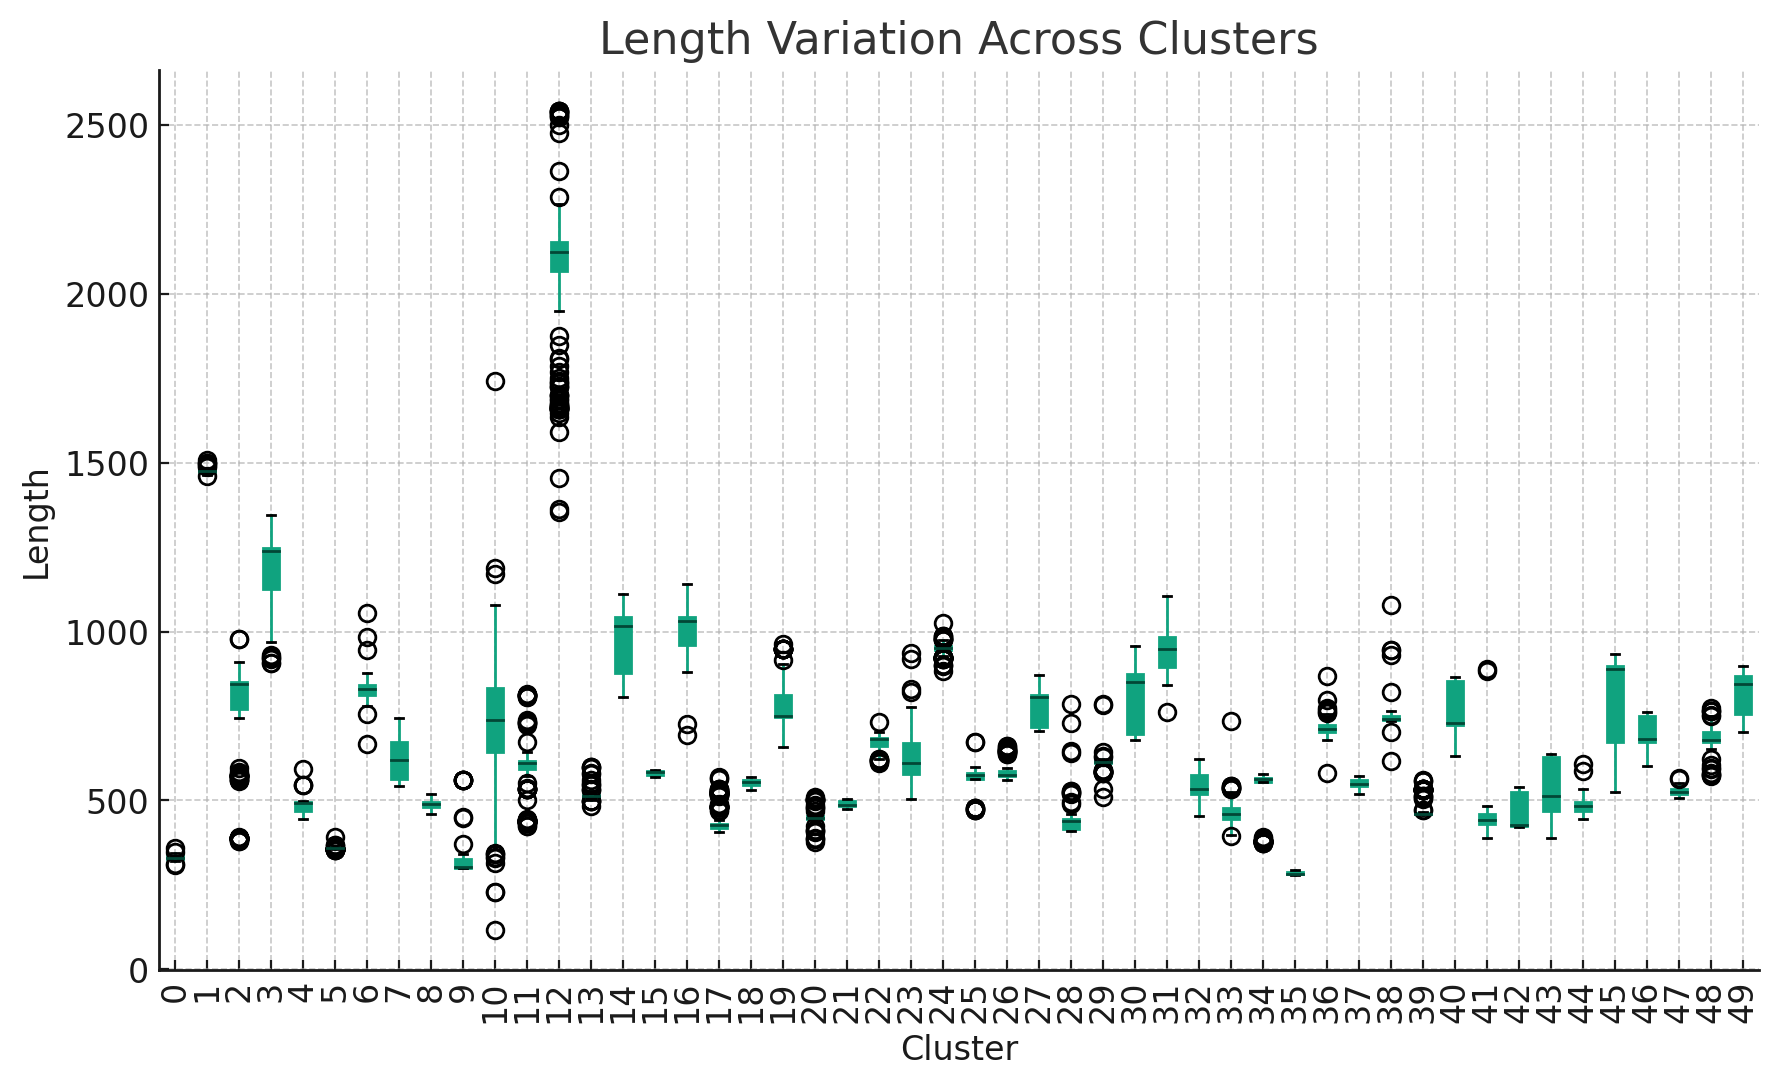
– second one is a box plot which displays the spread and the outliers in the lengths of the texts within each cluster
Histogram of texts grouped per cluster
Box plot showing the spread and outliers in the lengths of the texts per cluster
Next step: Labeling
Labeling is the process of adding one to three word descriptions to an item. In my case to a piece of text. The intention of the process is:
- Generate labels from the (already clustered) texts
- Verify if the labels cover your needs
- Add the labels to the texts
- Compare similar labels between different clusters
1. Generate the labels using Data Analyst
I uploaded my texts to Data Analyst (part of ChatGPT) and asked for the labels. I provided a series of about 40 relevant labels that served as input and example to the model. After some iterations the sytem provided me with around 70 labels that should cover the essence of all of the text. Truly amazing ![]()
2. Make sure the labels cover your needs
This is basically a manual process. Read texts from each cluster and see if there are 1 or more labels that cover the most important topics. Keep in mind that the goal of this exercise is to create a blueprint of 8000 training tips, to easily select the right tip to the right problem. So, in my case either the behavioral problem(s) or the training goal(s) needed to be displayed in the label. Some of the words that I used were: visit, bite, bark, barking behavior, communication, doorbell, clarity, own energy, emotions, obedience, sounds, mood and 60 others.
3. Add the labels to the texts
The biggest operation is to add the labels to the 8000 tips. We have the pre-processed texts and we have the labels. Now we need to link them together. I would say there are 3 ways to do that:
- Via ChatGPT Data Analyst
- Via the Labeling Option in Azure ML
- Via Python Code using the Spacy library
First, I tried the ChatGPT Data Analyst
This option gave me really good results at times, but it struggled when the dataset got too big. The outcome I got looked like this:

Note: Those are a snippet of the labels added by Data Analyst
Next I tried the Azure ML Labeling option:
I uploaded the file and labels but got in trouble with the required computing power. I needed to scale up but that was not possible in my subscription. But there’s also a manual way of doing this without Machine Learning. But this requires you to train the model manually by teaching it for at least 100 tips which label(s) belong to which tips. I started doing this but it was too cumbersome so I abandoned this option.
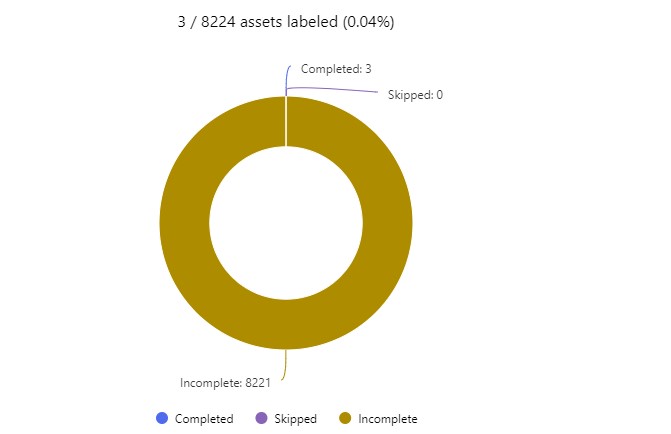
I stopped labeling after manually teaching Azure ML Labeling 3 tips. This is simple too time consuming.
Third option I used was the Spacy Library in Python. Spacy is an excellent Text Processing tool with multiple language modules.
The steps I followed were:
– Load the SpaCy Model: import the correct language module
– Add Match Patterns: Each keyword is transformed into a pattern where the matching is based on the lemma (base form) of the word in the text. These patterns are added to a ‘Matcher’ with a corresponding label.
– Assign Labels: A function named assign_labels was defined, which processes a given text using the SpaCy model to convert it and then uses a Matcher to find patterns.
The great thing about this code is that it can be re-used to automatically tag text with predefined labels thus applying the labeling process to new unseen data.
The result I got looked something like this:
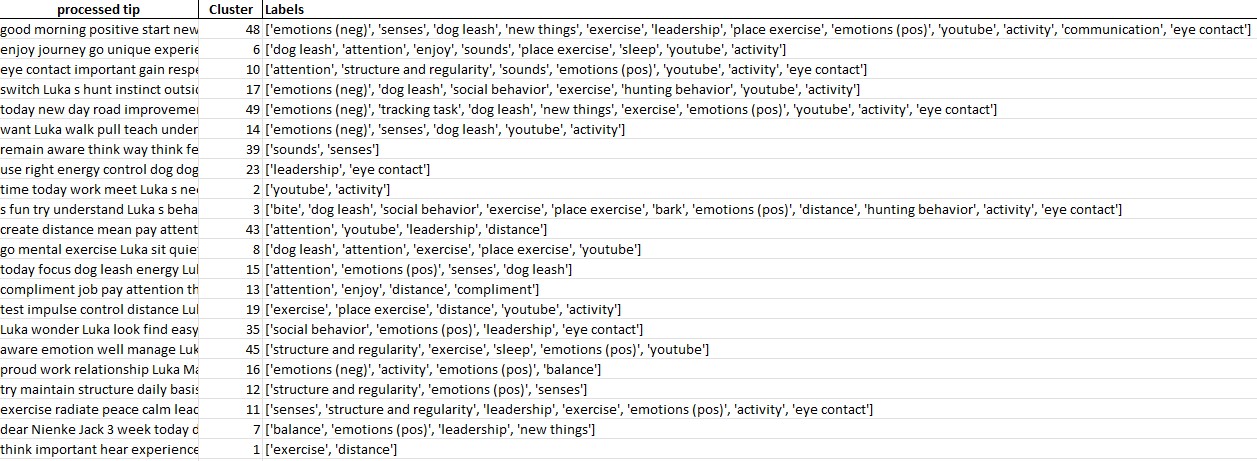
The labels are somewhat different because I reduced the input label list, but the result is excellent.
Final step: combining cluster and label
Reducing the number of tips to 1 per cluster
After the detailed labeling process I took a new efficiency step to bring the labeling to a higher level. I took each cluster and compared them with the labels (in Excel). I then decided to give each cluster a new top level label of max 3 words, derived from the Labels column previously generated. This step reduced the list of tips to 50, one for each cluster.
Reducing the labels to 5 top level labels
My final step was to reduce the 50 labels I had to only 5 top level ones. These top level labels represented the 5 main areas for which tips were provided. I was able to link the 5 main areas to the number of tips that were used, thus creating an insight what areas are targeted the most.

Mindmap
One final way of looking at the end result is by using a ‘mindmap‘. This technique aggregates all high level tips and labels into a structure. It helps analysis ny showing relationships between elements.

Conclusion
In this blog post, I have explored the steps of analyzing a large number of texts by clustering and labeling them. Ultimate goal in this project was to provide high level insight in areas that need to be targeted in order to improve dog behavior and increase skills and knowledge of the dog owner. This work can serve as an input to an automatic Machine Learning model that could then cluster and label texts automatically.
My analytics work may be valuable in any organization where texts need to be labeled or classified. This may involve social media posts, chats conversations, sentiment analysis of earning transcripts and many more.
Thanks for reading my blog.
The coding I’ve done (in VS Code)
Check out the code of this project on Github: Text-Clustering-and-Labeling

